


 The finishing touch on any beautiful interior house painting project is a quality door, window, and trim paint job.
Properly painting these areas is tedious and time-consuming but it's well worth it because it will make all the difference between a good paint job and a great paint job.
Before you get started make sure you're picking the right tools for your project, as they will make the process much easier.
Doors
Prep - Make sure the doors are properly prepared before applying any paint. Use a paintable wood filler to fill any dings, dents, or holes in the surface, then sand smooth. If the doors have been previously painted you should give them a quick scuff-sand with some 220-grit sandpaper to allow the newly applied coating to bond better. After sanding, wipe the doors down with a clean cloth or dust brush to remove any dust from the surface.
If the doors are bare wood then you should first apply an oil-based or latex-based primer made specifically for bare wood prior to painting. If they were previously stained and varnished follow these tips in our article about painting over stained wood.
Be sure that the gap where any trim touches the walls is caulked with a high quality paintable caulking.
Make sure that the door's hardware (lockset, hinges, and latch) have either been removed or taped-off to protect them from getting painted.
Paint -Start by straining your paint with a paint strainer to remove any debris. Use the same process for protecting your work area and preparing your applicators that I described in the last blog post about how to paint walls and ceilings.
If the top and bottom edges of the door have never been painted before, consider removing the door by pulling the hinge pins so you can more easily paint these hard-to-reach areas. Even though no one will ever see these areas, painting them will seal the door to help slow down and possibly reduce the expansion and contraction process that occurs during changes in weather or the seasons - decreasing the chance of a door not properly closing when this change happens.
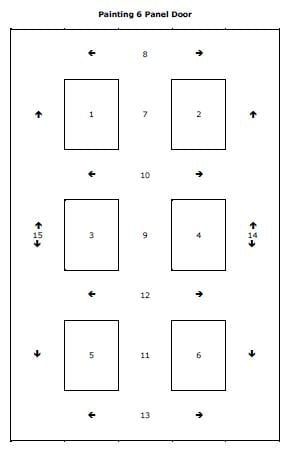
Although it's not absolutely necessary, for best result when painting a 6-panel door you might want to follow the Painting & Decorating Contractors of America's proper task sequencing - thinking of each area as its own section.
1. Start by painting the edges on the hinge and latch sides of the door.
2. Following the sequencing order in the picture below, paint the panels (1-6), beginning with the molding and border detail along the perimeter of each panel first, then paint the flat panel surface. Apply the paint liberally, then brush away any excess from the molding and border detail followed by the flat portion of the panels. Brush in the direction of the wood grain and feather out any excess paint with your brush as you go.
3. Finally, paint the rails and the styles (7-15). Apply the paint liberally, brushing in the direction of the wood grain and feathering out any excess paint with your brush as you go. To speed up the process you can use a 4" mini roller to apply the paint to the surface then go back over it with your brush to match the brush-stroke texture of the rest of the door.
Apply a second coat as necessary to achieve complete and uniform coverage.
Leave the doors open until they are completely dry. If you must close the doors before they have had time to cure or you are experiencing sticking of the doors when you close them, try applying a small amount of talc powder with a cloth rag around the perimeter of the door where it closes against the jamb. This should prevent it from sticking.
Windows
Prep - Just as you did with the doors, make sure the window sashes and trim have been properly prepared before applying any paint. Use a paintable wood filler to fill any dings, dents, or holes in the surface, then sand smooth. If the windows have been previously painted you should give them a quick scuff-sand with some 220-grit sandpaper to allow the newly applied coating to bond better. After sanding, wipe the windows down with a clean cloth or dust brush to remove any dust from the surface.
If the windows are bare wood then you should first apply an oil-based or latex-based primer made specifically for bare wood prior to painting. You can also try Masking Liquid H2O which not only works well as a bare wood primer but also can be applied directly to the glass for use as a liquid masking tape to save you a ton of time over using painter's tape. It can then be peeled-off of the glass when the paint dries.
Be sure that the gap where any trim touches the walls is caulked with a high quality paintable caulking.
Make sure that the window hardware (locks, handles, etc.) have either been removed or taped-off to protect them from getting painted.
Scrape all excess paint and putty residue off of the surface of the glass using a razor blade scraper and window cleaner.
If the muntins (the strips of wood which divide the window into individual panes or lites of glass) are removable, you can take them out and paint them separately to greatly speed up the process.
Paint - Assuming you have double-hung windows (the upper and lower sashes will both slide up and down), the following process will apply. If you have single-hung windows (only the lower sash will slide up and down, and the upper sash is fixed in place) you may have to remove the lower sash by removing the window stop trim so you can reach the bottom portion of the upper sash.
1. Reverse the sashes by pulling the upper one down and the lower one up. Paint the lower sash and the bottom half of the upper sash, in the direction of the wood grain. Allow the paint to lap ever so slightly onto the glass where the wood and glass meet. This will seal the edge of the wood to keep moisture out. You'll come back after it's dry to clean up any excess paint on the glass.
2. Un-reverse the sashes by sliding the upper and lower sash so that they are nearly closed, leaving a small gap at the top and bottom. Paint the remainder of the upper sash in the direction of the wood grain, allowing your paint line slightly onto the glass as described above.
3. If your muntins are not removable you can finish them by brushing them with a smaller brush in the direction of the wood, also allowing your paint line slightly onto the glass.
4. Finish your windows by painting the window trim top to bottom, doing the edges first then the face of the trim.
Apply a second coat as necessary to achieve complete and uniform coverage.
Keep your sashes open as described above until the paint has dried. Move each sash up and down daily for one week to prevent the window from sticking.
Once the paint has dried you'll want to straighten up your paint line where the glass meets the wood on your windows. Hold the edge of a 6-inch-wide putty knife blade against the glass, with its flat side against the wood, and scrape up to it using a razor blade window scraper. You'll be left with a neat, even strip of paint on the glass that's the thickness of the blade. To avoid scratching the glass when scraping it, lightly wet the window with some glass cleaner, being careful not to get any cleaner on your newly painted surface - as it could damage the finish.
Trim
Prep - Follow the steps to prepare the trim moldings exactly as you did for the doors and windows.
Paint - Start painting in one corner of the room and work your way around the room back to the starting point, following the direction of the wood grain.
In rooms where there are more than one level of molding or trim (i.e. base, chair rail and crown molding) start with the upper most molding first then proceed to the lower molding (for example – all high crown molding around the room and then the chair rail and base done together around the room because these may be reached from one position).
Apply a second coat as necessary to achieve complete and uniform coverage.
Contact us if you need any help with your project.

Photo by: donaleen / CC BY 4.0

Contact the Pros
Ready to get started with your next painting project but unsure if it is in your budget? Reach out to the expert painting team at ImageWorks Painting to schedule a free consultation today. Give us a call at 724-898-2446, or request a visit online.